Übergabe an einen Agenten
Diese Funktion ist nur im STANDARD- und PRO-Paket verfügbar.
Haben Sie Ihren Chatbot eingerichtet, erhalten aber immer noch viele irrelevante oder sich wiederholende Anfragen? Sie möchten Ihre Kunden dazu ermutigen, die Antworten im Chatbot zu finden und sich nur bei komplexeren Fragen an Sie wenden?
Mit der neuen Chatbot-Funktion, die es ermöglicht, Nachrichten von einem Bot an einen Agenten zu übertragen, erhalten Sie nur relevante Fragen von Besuchern, die das Potenzial haben, Kunden zu werden.
Wie funktioniert es?
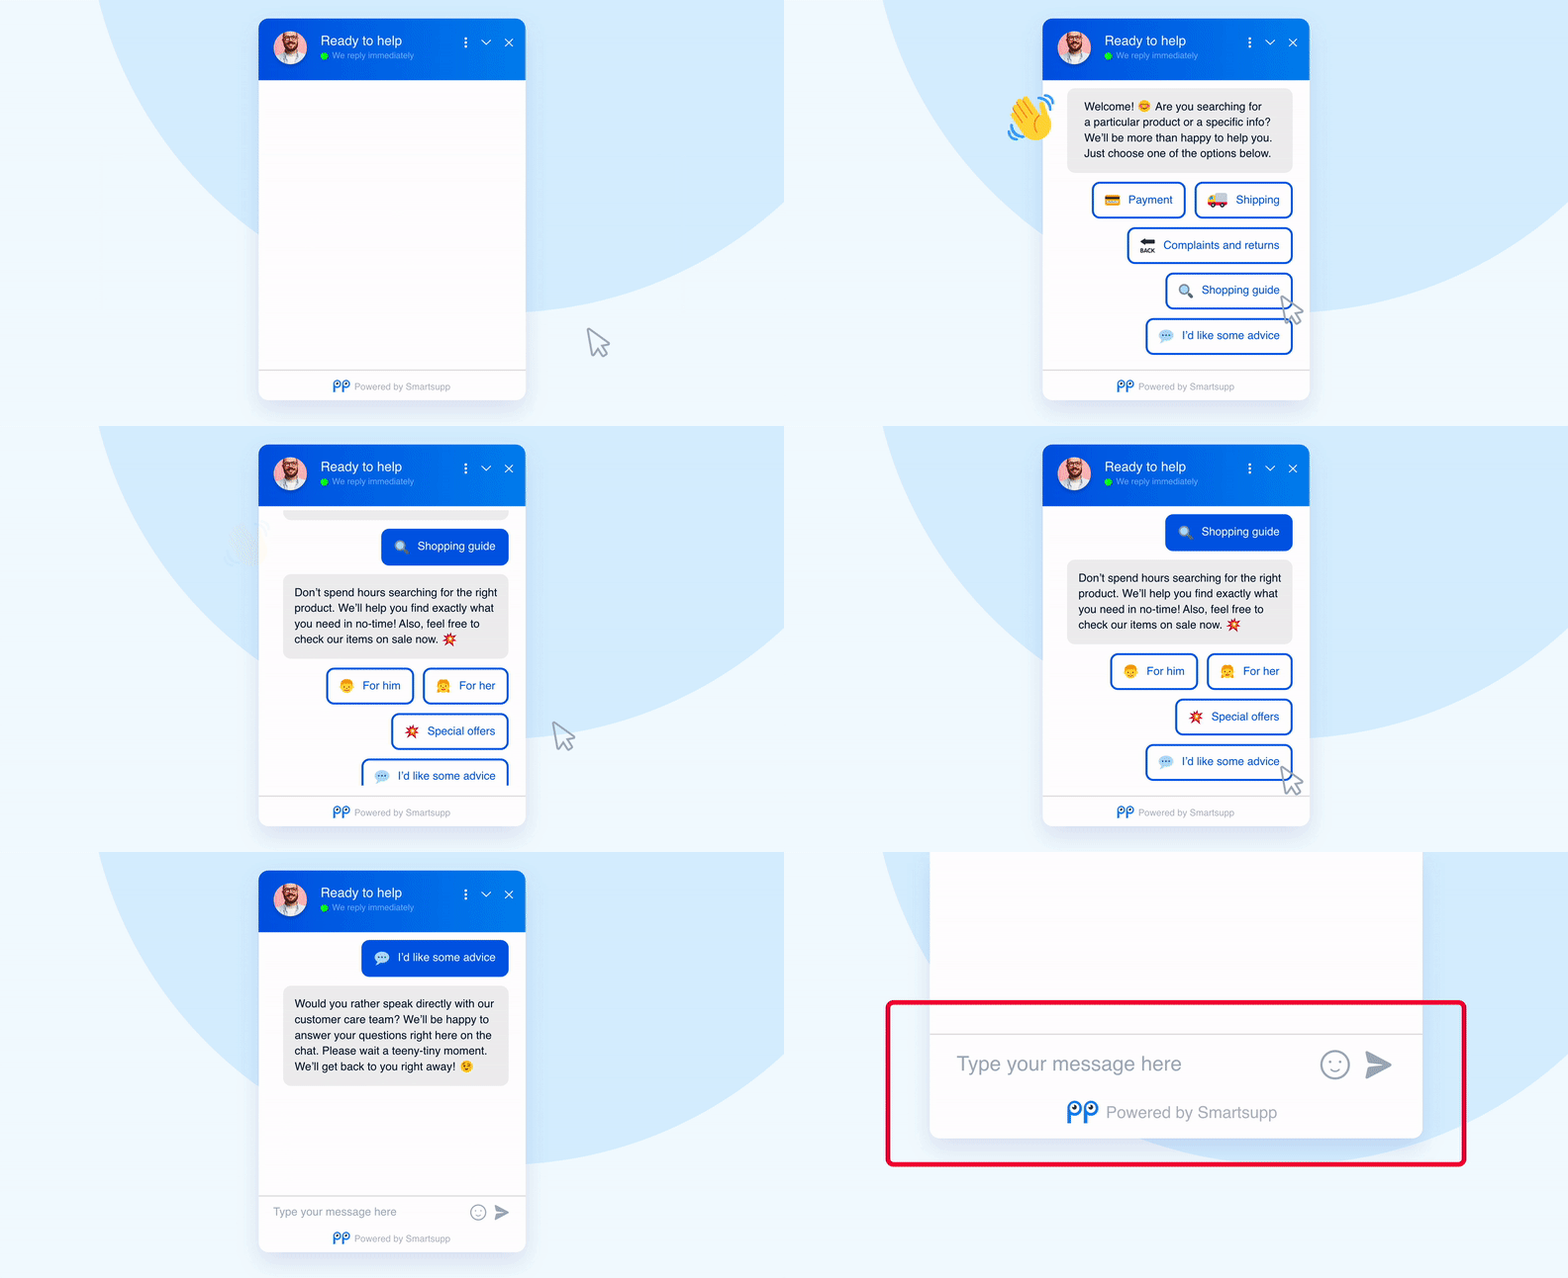
Zuerst schalten Sie das Textfeld in der Chat-Box aus. Wählen Sie dann bestimmte Schaltflächen in Ihrem Chatbot aus, die verwendet werden, um die Konversation an einen Agenten weiterzuleiten. Wenn ein Besucher auf eine dieser Schaltflächen klickt, erscheint das Textfeld erneut und er kann Sie kontaktieren. Gleichzeitig erhalten Sie im Dashboard eine Benachrichtigung, dass ein Kunde mit Ihnen sprechen möchte.
Dadurch werden Besucher ermutigt, zuerst den Chatbot zu erkunden, bevor sie Sie kontaktieren. Die meisten Besucher, die dann zu Ihnen kommen, stellen relevante Fragen zu Ihren Produkten oder Dienstleistungen, und Sie können sie leicht zu zufriedenen Kunden machen.
Wie richte ich es ein?
Deaktivieren Sie das Textfeld in der Chat-Box
Beginnen wir damit, in die Chatbot-Garage zu gehen und einen neuen Chatbot zu erstellen oder einen bestehenden zu öffnen. Wenn Sie sich nicht sicher sind, wie man einen Chatbot erstellt, schauen Sie sich unser Tutorial an und Sie werden im Handumdrehen alles wissen, was Sie brauchen. :)
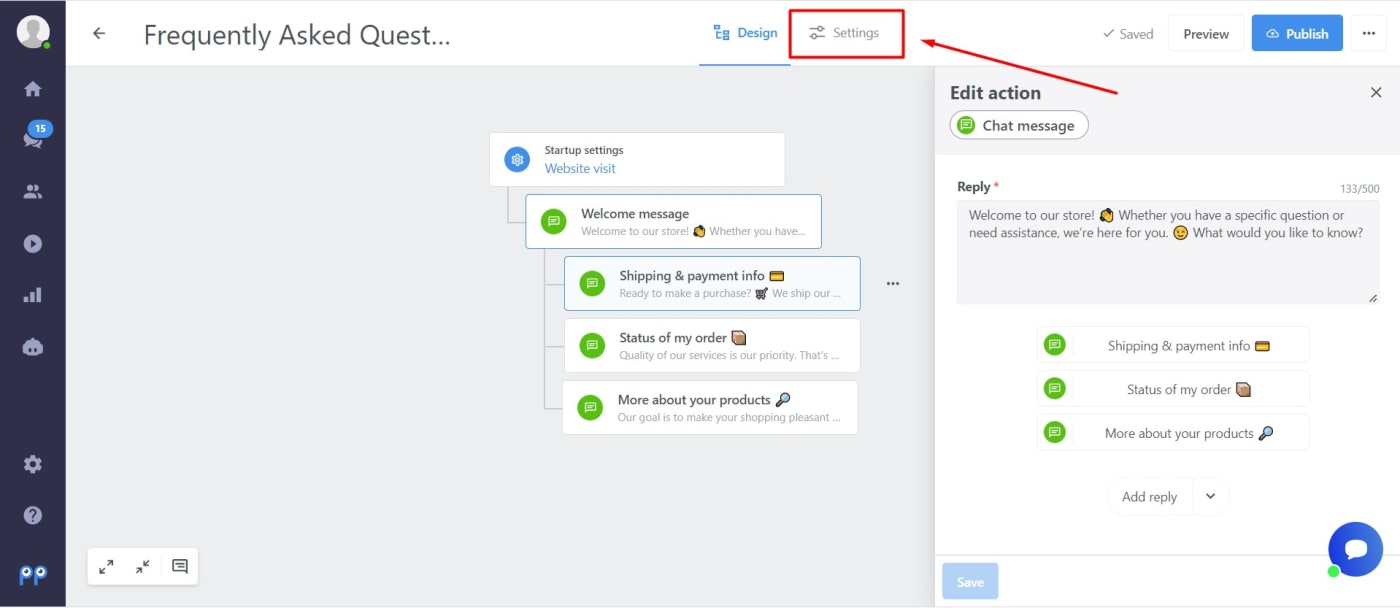
Sobald Sie Ihren Chatbot öffnen, gehen Sie zum Abschnitt „Einstellungen“.
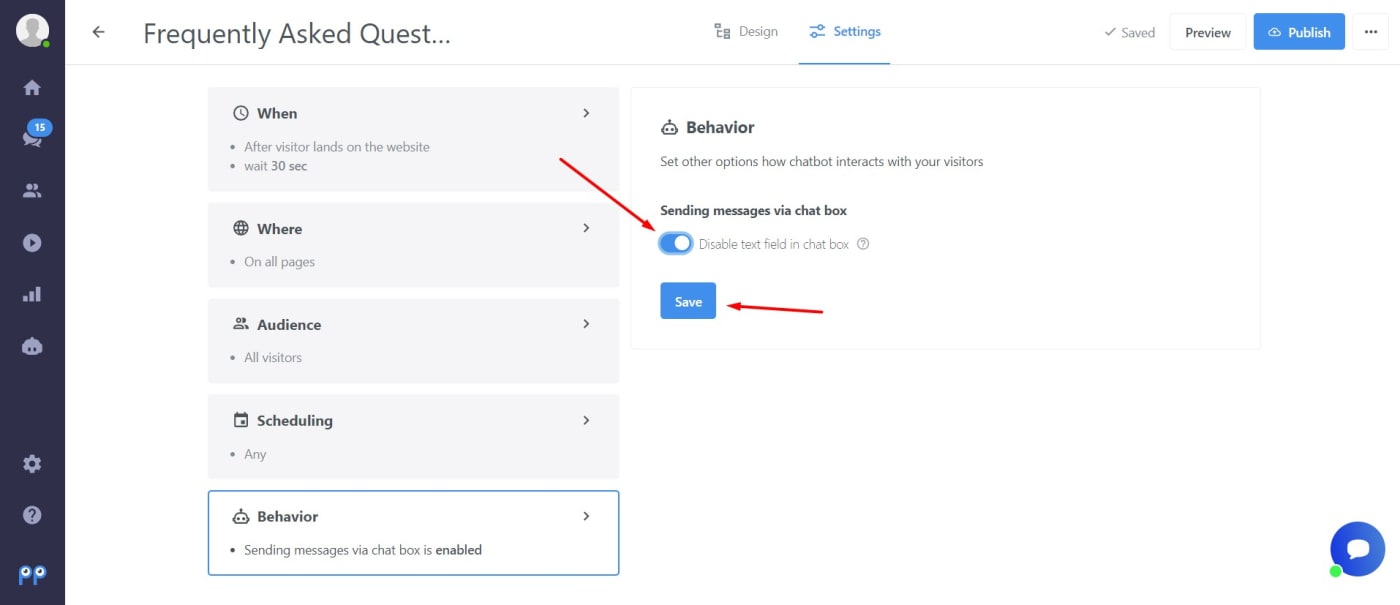
Wählen Sie hier die Kategorie „Verhalten“ und aktivieren Sie dann die Option „Textfeld in der Chat-Box deaktivieren“. Vergessen Sie nicht, Ihre Änderungen zu speichern.
Hinweis: Wir empfehlen, den Chatbot so einzurichten, dass er entweder erscheint, wenn ein Besucher auf die Chat-Box-Schaltfläche klickt, oder 1 Sekunde, nachdem der Besucher die Website kommt.
Wählen Sie im Abschnitt „Wann“ entweder die Option „Nachdem der Besucher auf der Website kommt“ oder „Nachdem der Besucher auf die Chat-Box geklickt hat“ (Wenn Sie den Chatbot sofort anzeigen möchten, stellen Sie die Verzögerung auf 1 Sekunde ein.)
Dadurch wird verhindert, dass das Textfeld sichtbar ist, bevor der Chatbot gestartet wird.
Es liegt an Ihnen, ob Sie Ihrem Chatbot weitere Bedingungen hinzufügen möchten. Beispielsweise können Sie den Chatbot nur auf einer bestimmten Seite oder einem bestimmten Publikum anzeigen usw. ... Wenn Sie mehr über die Chatbot-Bedingungen und deren Einrichtung erfahren möchten, können Sie sich unser ausführliches Tutorial ansehen.
Fügen Sie die Option hinzu, die Konversation an einen Agenten weiterzuleiten
Jetzt können wir lernen, wie man Gespräche von einem Chatbot an einen Agenten überträgt. Zunächst empfehlen wir, alle Verzweigungen und Antworten in Ihrem Chatbot zu erstellen, in denen Sie den Chat deaktivieren möchten. Lassen Sie sich von unserer speziell für E-Commerce erstellten Chatbot-Vorlage inspirieren.
TIPP: Sie können beispielsweise eine Reihe von Fragen und Antworten auf häufig gestellte Fragen wie Versand oder Zahlung erstellen, Rabatte anbieten, Besucher über saisonale Veranstaltungen informieren oder einen Shopping Guide erstellen, der Kunden hilft, das gesuchte Produkt zu finden.
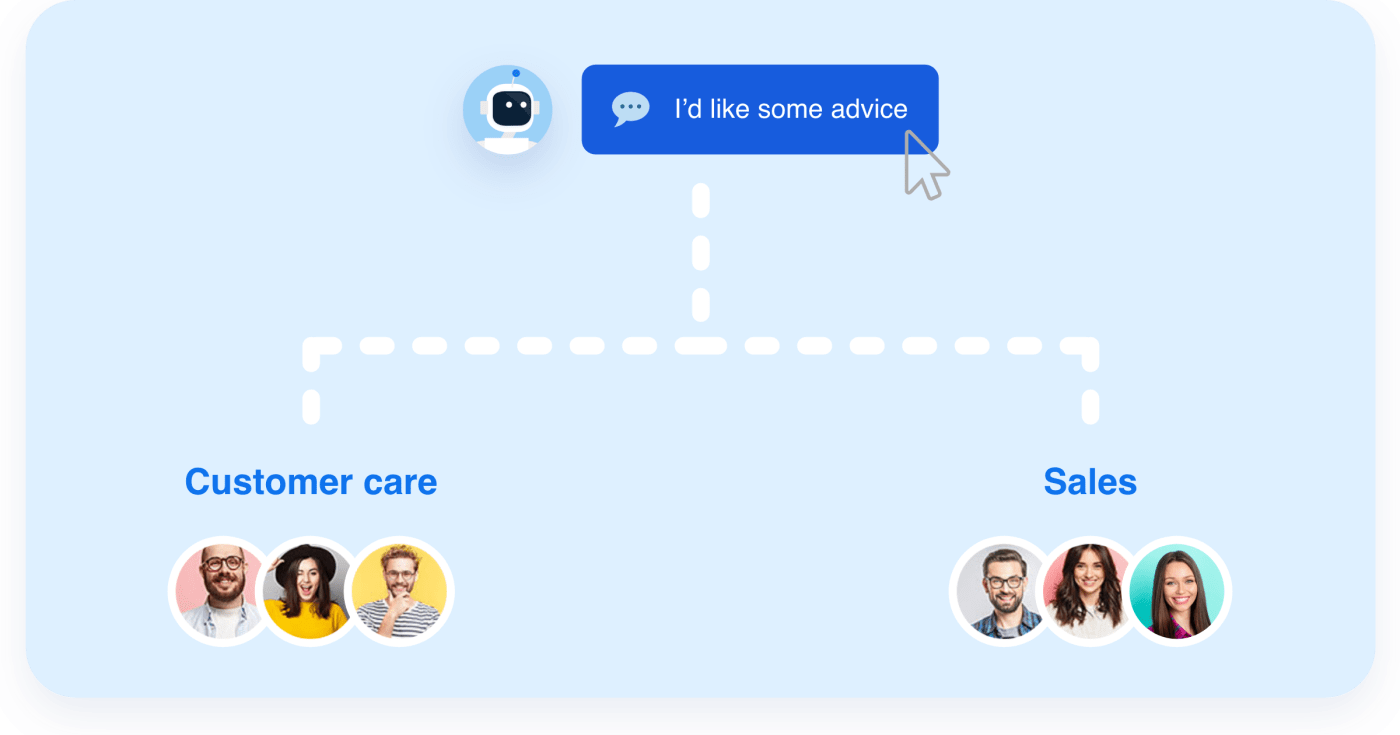
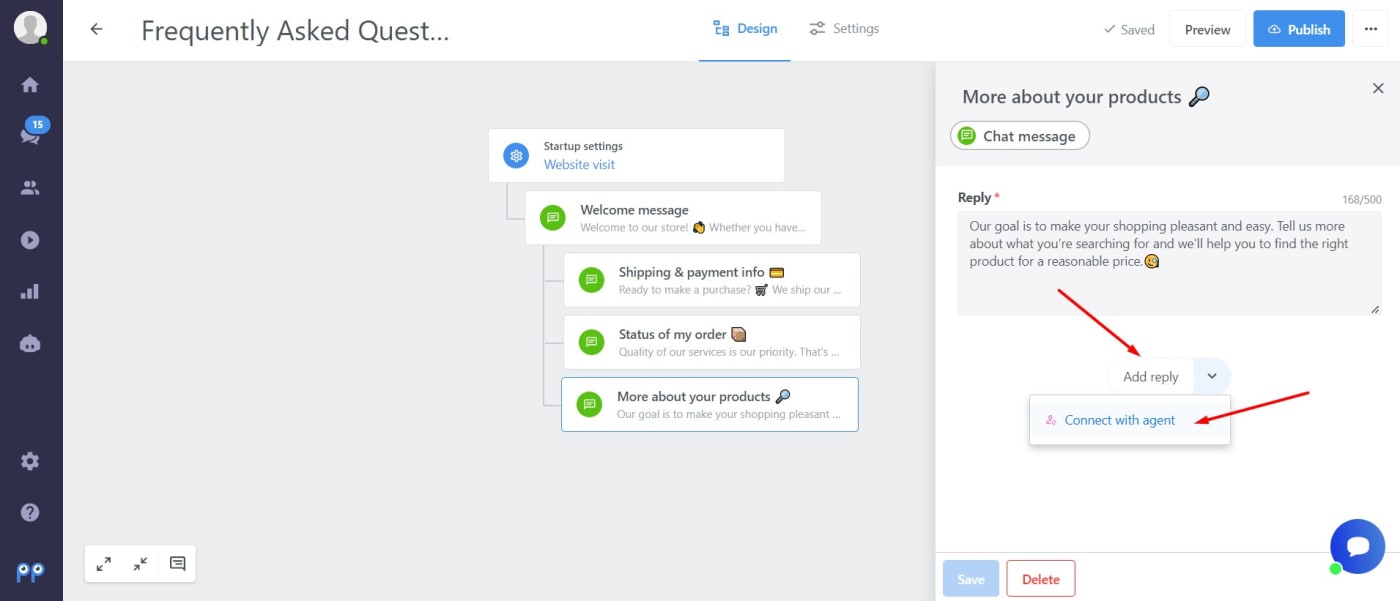
Sobald Sie fertig sind, können Sie mit dem Hinzufügen von Schaltflächen beginnen, die dazu dienen, den Agenten zu kontaktieren. Wählen Sie eine Verzweigung oder mehrere Verzweigungen aus, die Sie beenden möchten, mit der Option, die Konversation an einen Agenten weiterzuleiten. Klicken Sie auf die letzte Nachricht in diesem Zweig, wählen Sie „Antwort hinzufügen“ und dann „Mit einem Agenten verbinden“.
Geben Sie zum Schluss einfach den Titel der Schaltfläche ein, z. B.: 💬 Ich hätte gerne einen Rat
Und bereiten Sie eine Antwort vor, die der Besucher erhält, nachdem er auf die Schaltfläche geklickt hat. Es kann zum Beispiel so etwas sein:
Wir freuen uns, direkt hier im Chat mit Ihnen zu sprechen und Ihnen bei der Lösung eventueller Probleme zu helfen. Bitte warten Sie einen Moment und wir werden uns umgehend bei Ihnen melden. 😉 In der Zwischenzeit können Sie uns gerne mitteilen, wie wir Ihnen helfen können.
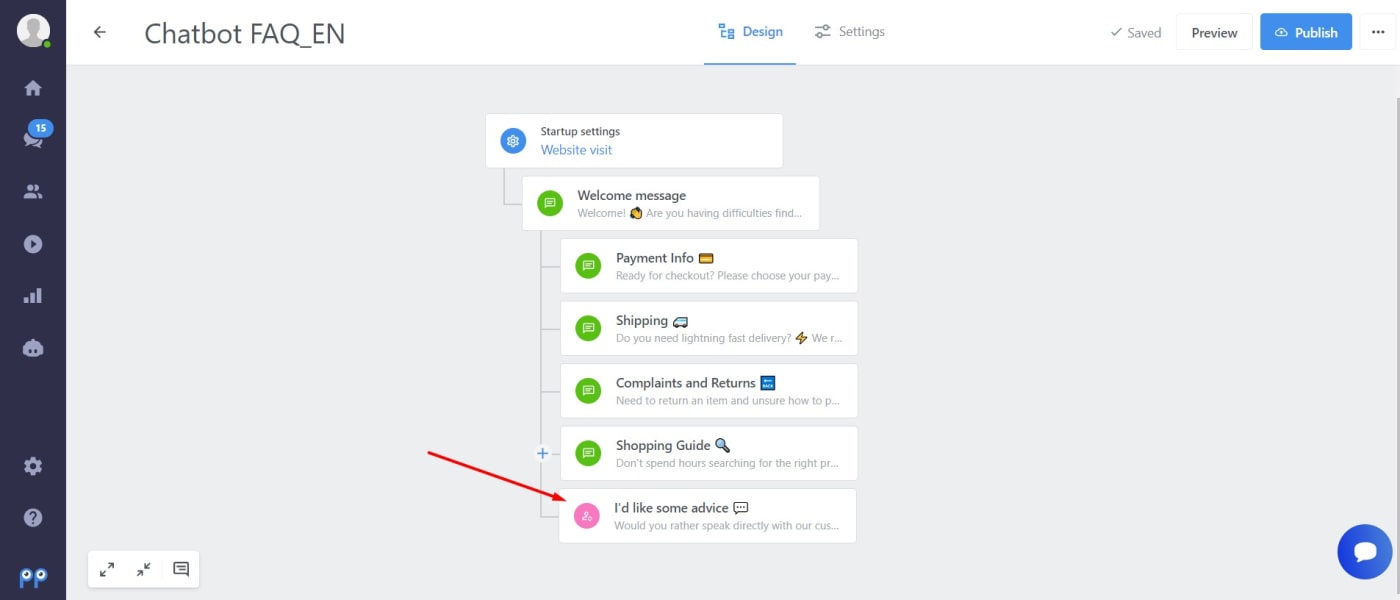
Sie können dasselbe für alle anderen Zweige tun, die Sie beenden möchten, mit der Option, die Konversation an einen Agenten weiterzuleiten. In der Baumstruktur Ihres Chatbots erkennen Sie diese Optionen leicht an dem rosafarbenen Icon.
Wenn Sie sehen möchten, ob Ihr Chatbot so aussieht, wie Sie es sich vorgestellt haben, klicken Sie auf „Vorschau“ und Sie können überprüfen, wie der Chatbot nach der Veröffentlichung auf Ihrer Website aussehen wird.
Verhalten mehrerer Chatbots:
- Falls Sie Chatbots mit deaktiviertem Textfeld (DTA) verwenden, wird auch die andere Automatisierung (Chatbots und automatische Nachrichten) ausgelöst
- Wenn Sie mehrere Chatbots mit DTA und verschiedenen Verzögerungen haben, werden alle ausgelöst, sobald der Besucher auf die Chatbox-Schaltfläche klickt
- Wenn Sie einen Chatbot mit aktiviertem Textfeld (ETA) und einen anderen mit deaktiviertem Textfeld haben, hängt die Aktivierung des Textfelds davon ab, auf welchen Chatbot der Besucher geklickt hat (Chatbot mit deaktiviertem Textfeld / keine Aktivierung des Textfelds, Chatbot mit aktiviertem Textfeld / Aktivierung des Textfelds)
Tipps zum Arbeiten mit Multi-Chatbots
- lassen Sie die Chatbots mit deaktiviertem Textfeld zuerst agieren. Für Chatbots mit aktiviertem Textfeld können Sie anschließend weitere Bedingungen einrichten
- richten Sie die Chatbots mit deaktiviertem Textfeld auf Unterseiten aus
- Sie können auch die Funktion der Routenführung zwischen Chatbots nutzen, um den Ablauf zu vereinfachen
- stellen Sie sicher, dass die Verzögerung zwischen den Chatbots ausreichend hoch ist
Übergabe an E-Mail
Diese Funktion ermöglicht es, jedes Gespräch an eine bestimmte E-Mail-Adresse weiterzuleiten, zum Beispiel an die E-Mail-Adresse Ihrer Agenten oder an ein Ticketing-System. Beim Einrichten Ihres Chatbots mit einem Übergabeknoten können Sie wählen, ob das Gespräch an einen Agenten oder an eine E-Mail-Adresse weitergeleitet werden soll. Diese Option kann sowohl für den Online- als auch den Offline-Status konfiguriert werden.
Konfigurationsschritte:
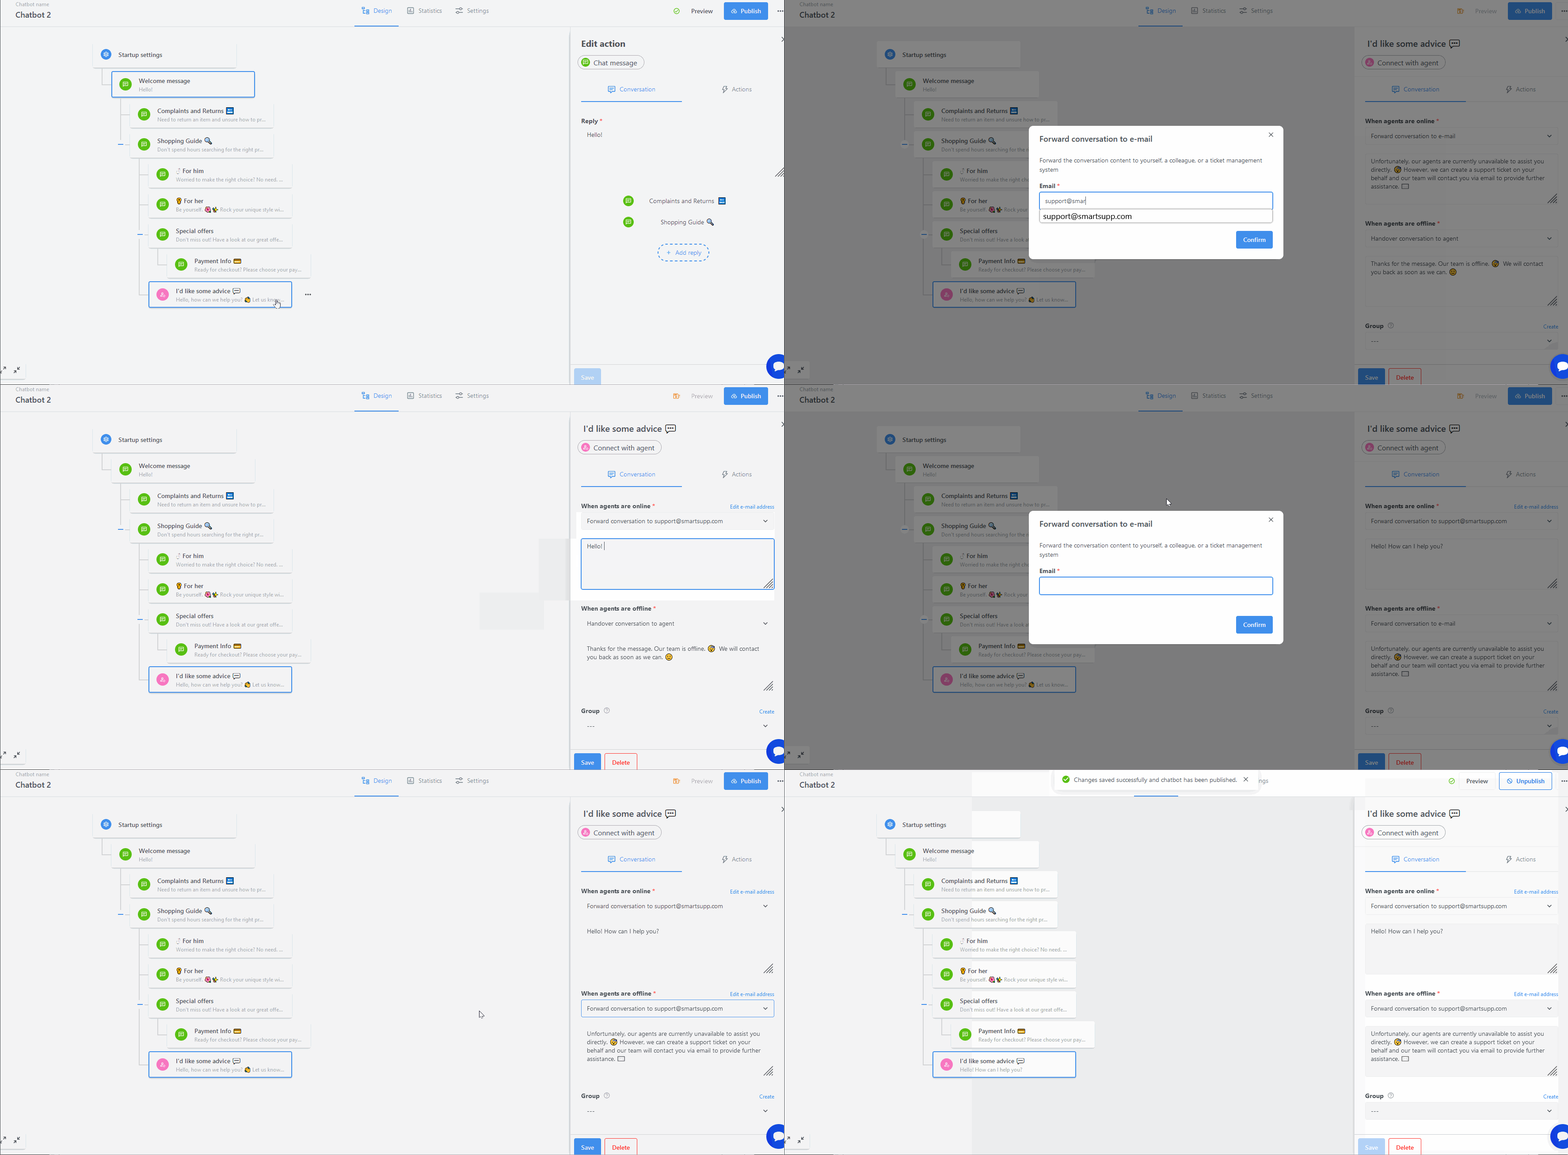
- Gehen Sie zum Reiter Automatisierungen und wählen Sie einen Chatbot aus oder erstellen Sie einen neuen, der einen Übergabeknoten enthält.
- Wählen Sie für jeden Status die Option Konversation an E-Mail weiterleiten aus und geben Sie eine einzelne E-Mail-Adresse ein.
- Sie können auch kurze Nachrichten für jeden Statusmodus verfassen.
-
Speichern und veröffentlichen Sie Ihren Chatbot.
Sie erhalten nun Konversationen für den ausgewählten Chatbot-Status in Ihrem E-Mail-Postfach.
Sie können das Konversation des Besuchers in Ihrem Posteingang über die Schaltfläche 'Konversationsdetails' einsehen. Das Konversation wird 2 Minuten nach Beendigung der Sitzung durch den Besucher verfügbar sein.
Nachdem die E-Mail gesendet wurde, kann der Besucher ein neues Gespräch starten und den Vorgang dreimal pro Stunde wiederholen. Sie können auch direkt per E-Mail auf diese Nachrichten antworten.
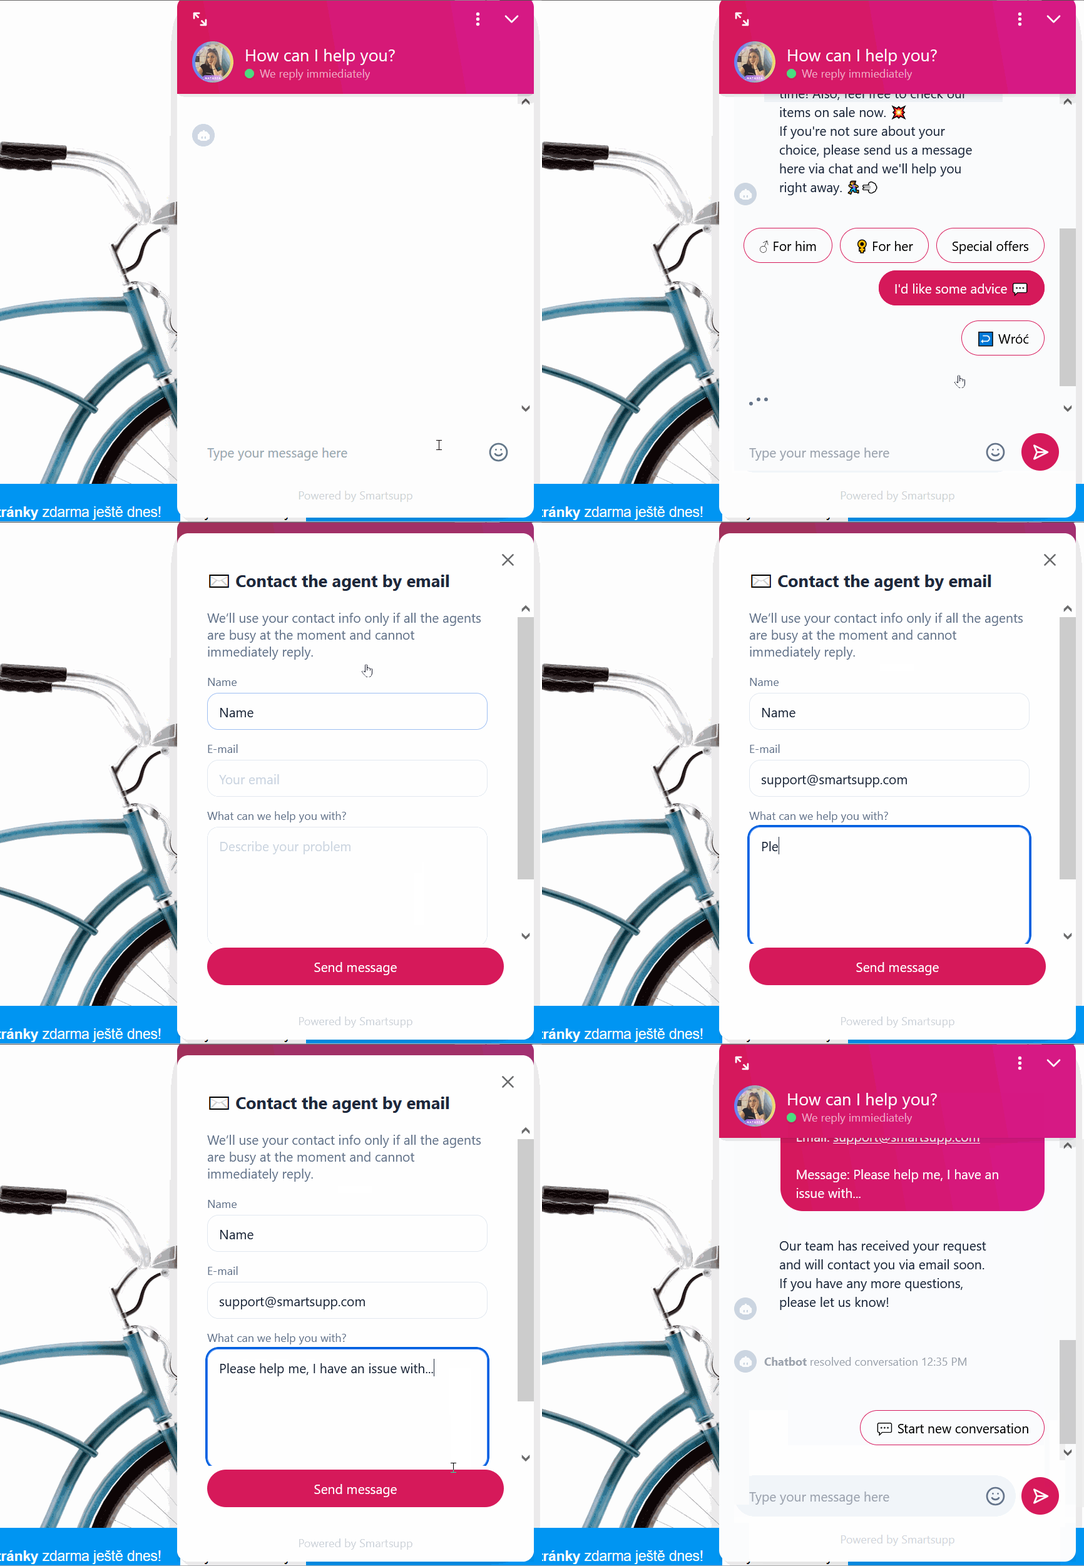
Sehen Sie unten, wie es aus der Sicht des Besuchers erscheint.
Hinweis: Diese Funktion unterstützt nicht die Option, automatisch Tags hinzuzufügen.
Hinweis: Gruppen werden dem Gespräch nicht hinzugefügt, wenn nur der Übergabe-E-Mail-Flow aktiviert ist.
